Yup - I know, I've been away... been taking a break from all things blog 'n' Etsy for a few weeks, focussing on the necessities of life and getting things in order - and I feel a lot better for it! I am sorry for being absent though - I had blog guilt at first, until I remembered that it's kinda MY blog so I suppose I make the rules... It WAS good to take a proper break and I know you'll understand!
Aside from stress management, the added bonus of achieving some degree of life-organisation is that I've had some time to journal and to MAKE stuff, which I haven't really felt like doing in a while. I have a stack of hand-made journals ready to load up on Etsy, and another batch just about done. Here are a few teaser photos -


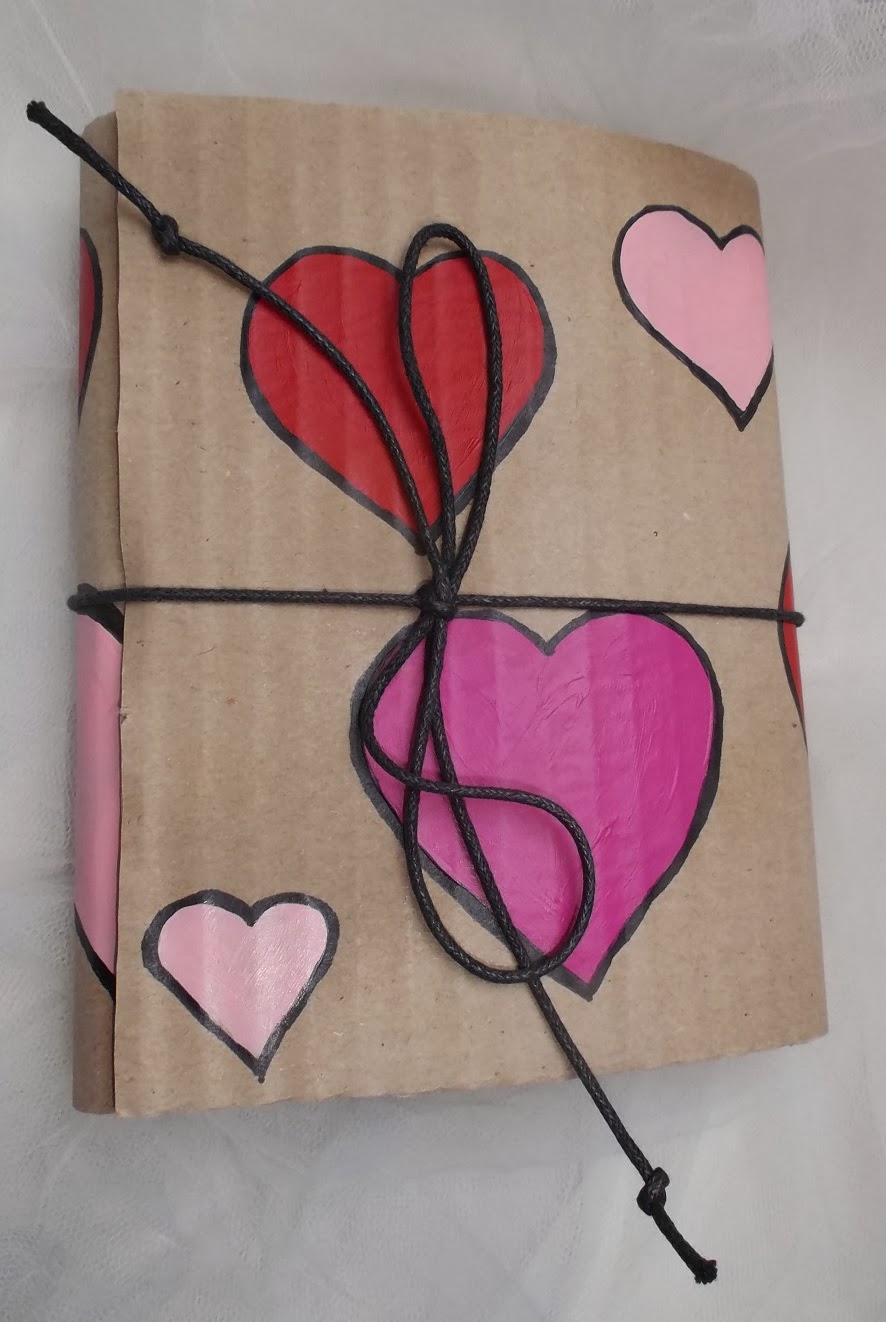


...so I've not been idle! I find that journal-making's a good way for me to step back into the art world and it's really quite relaxing. It's not that hard to do, really: if you've not tried making your own book, why not give it a go?
That brings me to the second part of this post. I had a lovely email from a wonderful blog reader the other day. She has a collection of sketches that she wants to bind together, but was stuck for ideas and needed some help. I was more than happy to pass on a useful (and versatile) binding solution, but as it was hard to just describe it without a truly insane amount of rambling, I figured I'd take the 'actual example' route. I've not done a tutorial in a while so I grabbed the opportunity to take pictures for you as I went along... I hope you find them useful! Here goes:
Stitched-in Binding Tutorial
For this project you will need:
- An old hardcover book that you're willing to chop up
- Some extra book covers or heavyweight card
- Your sketches, or some of your favourite art papers
- Sewing/binding materials. For example: waxed cotton thread, ribbon, embroidery/decorative thread, a variety of yarns (off-cuts will do), wire, or anything you prefer and can lay your hands on
- Glue, glue-stick or double sided tape (if you don't want to sew)
- Painty things - your choice!
- Shiny decoratey things, buttons and/or beads!
- Large-eyed needle, possibly an awl or pokey tool
- Hole punch or Crop-A-Dile
- A ruler
- A craft knife (optional)

This technique is especially useful if you have a collection of finished loose pages that you want to bind together. For the sake of this journal, I chose a stack of leftover papers of varying weights and textures -


You'll need to decide how you want to insert your pages into the book - you can use glue-sticks, wet glue, double-sided tape, string, ribbon, thread, wire..... it's up to you. Here's my selection of thready things:


Ok - now to begin. Tear a few pages carefully (or measure and cut straight with a craft knife if you prefer) about 1.5" from the spine -

I likes the wiggly lines! The weight of the page paper kinda indicates how many you should use for each insert. I chose four - two torn pages either side of the inserted sheet, like this -

Got it? Easy! If your book pages are really thick and glossy - like many children's books - you may only want to use one page either side of your insert. Likewise, if the pages are really thin or fragile you may want to add a few extra just to be safe.
Now you can either glue, tape or stitch in your pages. Up to you! If you choose to sew, you can be uber neat with your stitching, or just ... go for it! Choose the style and look that suits you and your work. If you're not confident with sewing, a simple running stitch will still do the job nicely...

Play with your stitches as much as you want to - add different coloured threads, then tie them off top and bottom so they don't slip...


One page done. Now go ahead and enjoy yourself. Remember you can use anything you like to decorate the fixer sections, and thread ribbon through the stitches for some nice texture effects. Here are some of my finished pages, coloured up with acrylic paints, Derwent inktense pencils and Caran D'Ache Neocolor II soluble wax crayons (incidentally the same media used to colour the pages.)


Sequins and ribbon and gold paint, oh my! Shiny, shiny... plus doodling fun. Now - I LIKE the more random, squooshy colours, but you can be more precise if you prefer. This is THE most versatile binding ever, and really, REALLY easy as you can just adapt it to your skill sets. No pressure, all fun!
* * *
Project idea:
You can make some full page spreads with your favourite photos, then bind them using a book that has some significance to you and your family. For example: use some photo spreads of your little ones in their jammies or with cuddly toys, along with some of their paintings and drawings, cuttings from their out-grown clothes or blankies etc and bind them inside their favourite story books. It's such fun, and unlike scrap-booking, there are no rules! You can adapt the binding methods and simplify them so that your kids can join in with the project. It's a great way to make and store memories. As an extra tip - bind in a couple of blank pages so that you can journal at a later date, or add ephemera as and when you find it.
* * *
Aaaaaaaaaaaaaaand back to the tutorial.....Now for the cover. The book I chose here is way smaller that the paper pieces. It's the right height, but too short to cover the longest pages. Problem? Nope! The cover can be extended as much as is necessary by adding more pieces of heavy card or, as in this case, another similarly sized book cover (from that hoarded, mahoosive stash), like this -

I measured out a series of points which I punched out with my trusty Crop-A-Dile, leaving to lines of small holes. To join them together, I chose some waxed cotton thread which I laced through the holes like I'd lace up a shoe.


Then I pulled them tight enough to keep the pieces together, but not so tight that they'd overlap...

You can choose your own style - whatever suits you. You can always use fabric instead card (and, incidentally, you can use the inside binding technique for fabric pages, tiles or plastic too, although for some materials you may need to pierce holes with a pokey tool or awl before you stitch or tie them in. Be inventive!). You can also use multiple pieces so that your cover is a work of art in itself, full of movement and shape.
To decorate the cover, I tied ribbons and yarns around the waxed cotton and added some beads and buttons....well, because I wanted to!


I painted the cover canvas with acrylic paints, dabbing some away with a baby wipe so that the original colour would show through - make it look more rustic. Then I splatted some lovely Winsor & Newton gold ink and added way more foofy lovely ribbony goodness -


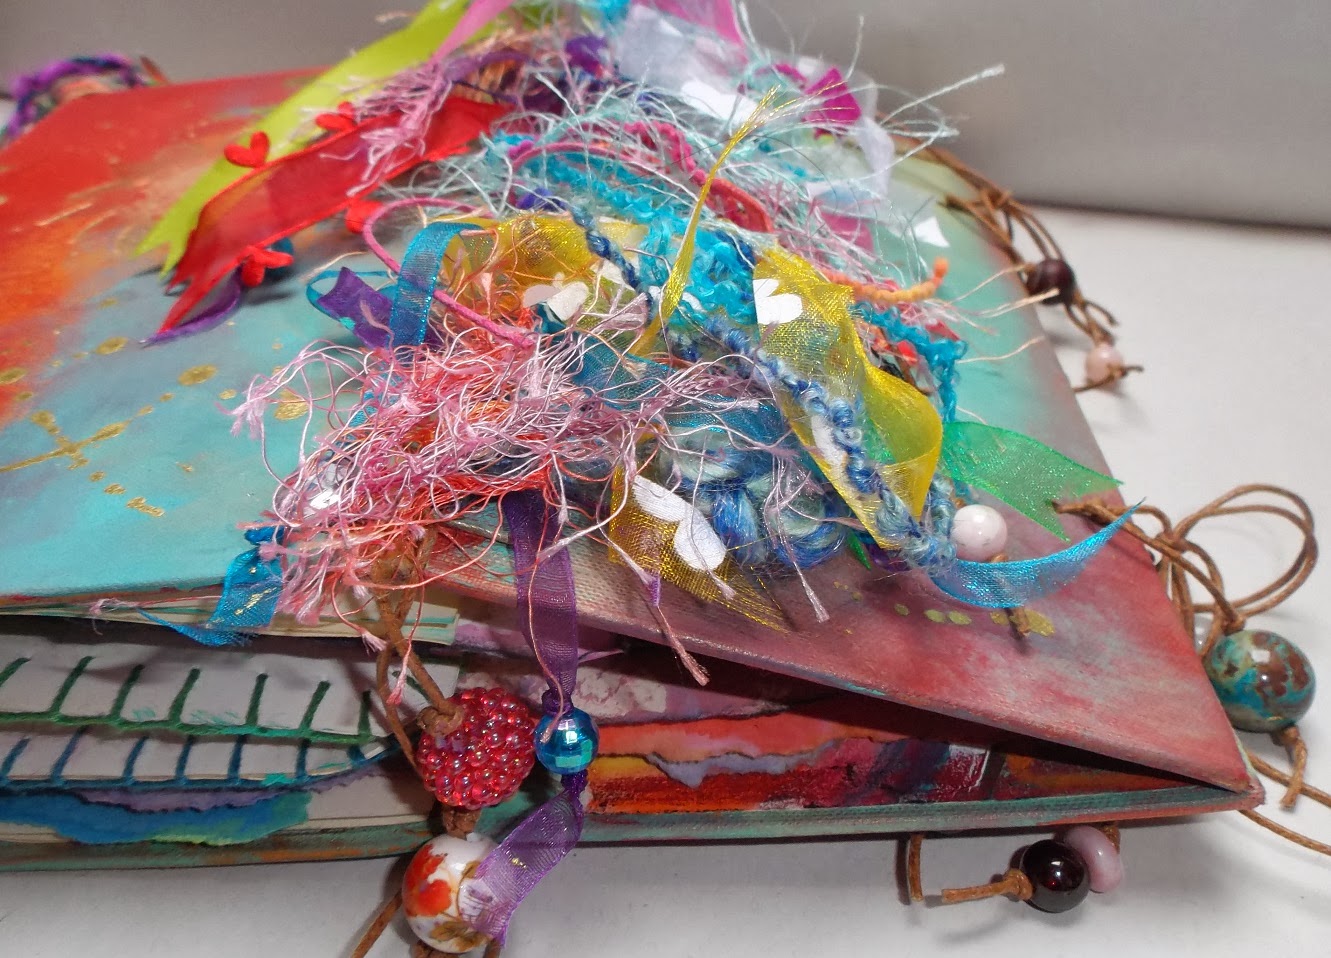


This style of cover really allows for some interesting display if you feel like making more of a feature of your work by presenting it proudly for people to admire. Add whatever fastening you prefer... I chose a simple tie fastening, adding some lovely agate, pink opal, garnet and sea jasper beads to finish it off nicely.

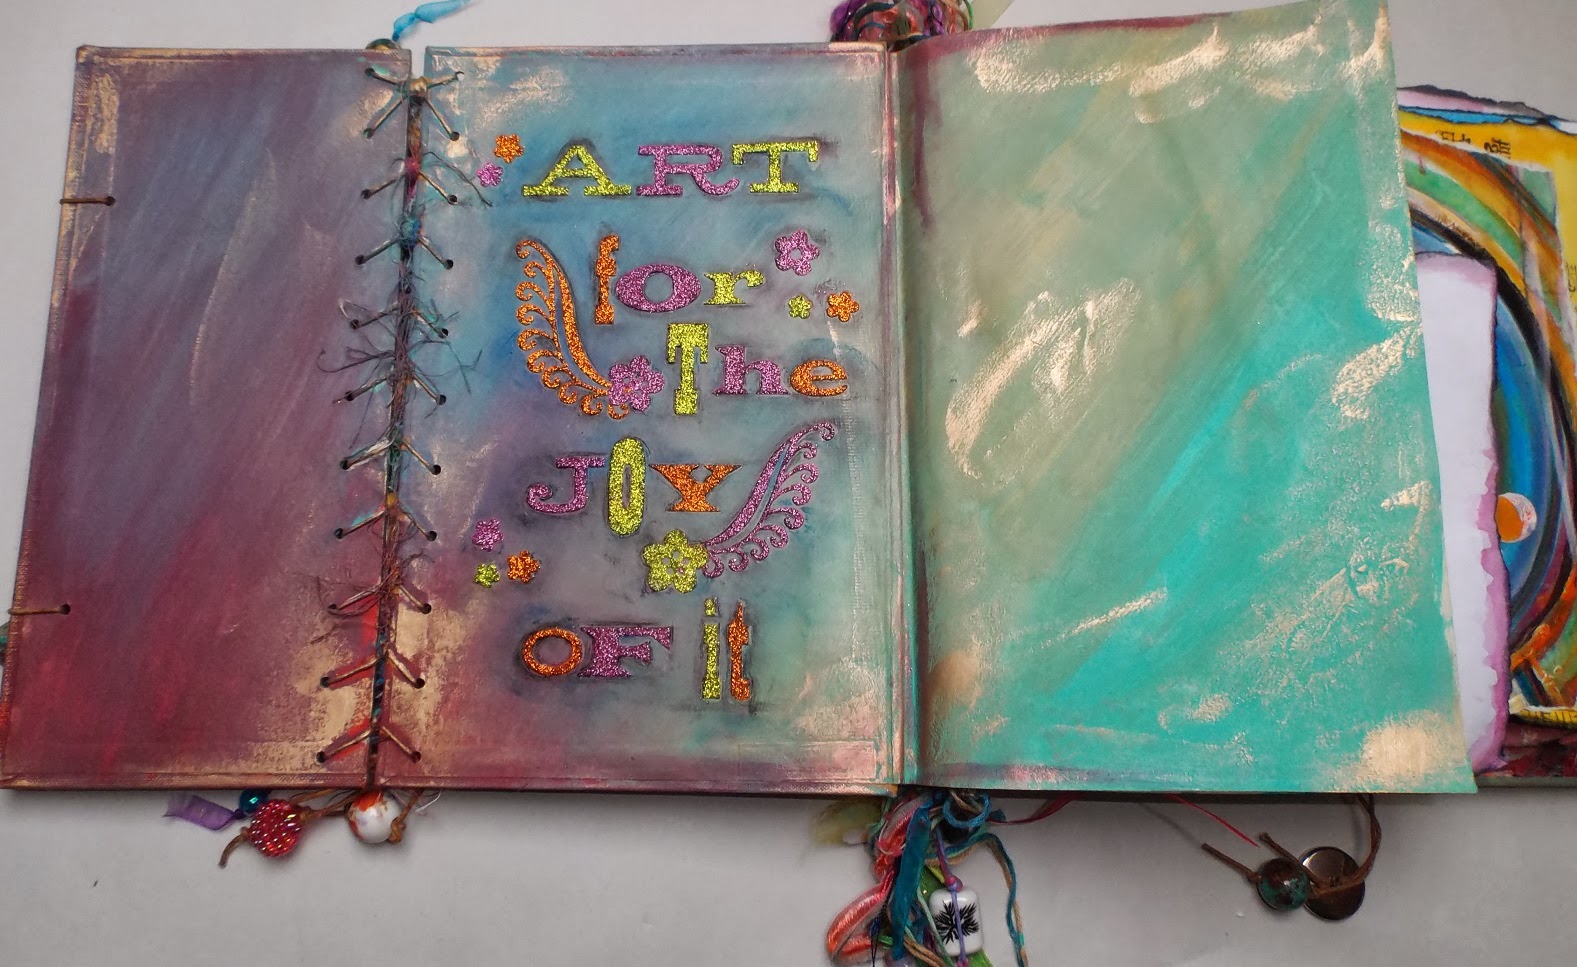
I also added a little reminder inside the front cover to have some stress-free fun with art:

...then found a couple of old doodly sketchbook pages to tear up and glue into the book, adding some extra colour and shape to some of the pages -


Inside back cover -

I kept a few of the original colour plates in the book, just blanket stitching them together. I may paint over them at some point, but I like that they're there...

Here are a few more pictures of the finished book -


And that's that! This is SUCH a fun and easy technique. You don't have to go and spend a fortune on branded products, just root around your craft stash and maybe visit your local charity or goodwill store if you need to pick up an old book. It makes a change not to have to spend a small fortune in order to complete a project, and I promise you'll enjoy it.
I hope I explained that ok - if you have any questions please leave a comment or email me at artyshroo@gmail.com and I'll get back to you asap. I'd love to know if any of you give this a go - or maybe have already done this? That would be awesome. I'd also like to take the opportunity to thank Emily for contacting me and for giving me something to work on! You little star you!
Sending hugs out to all of you in the blogosphere! See you soon - Shroo :) xxx
Nice to see you back....and I'm so glad that you enjoyed your break, we all need to that eventually. Thanks for your tutorial, I'm definitely going to give that a go.
ReplyDeleteIt's good to BE back - it is SO refreshing to take a break from things now and again! Glad you liked the tutorial - hugs from Shroo:)x
DeleteThis is awesome! I will have to follow your tutorial soon. I have lots of stuff leftover from an altered book event I did st my library.
ReplyDeleteThank you! :) I had fun making this - hope you have fun if you give it a go! Your library event sounds fun - did you blog it? Hugs from Shroo:)x
DeleteFabulous tutorial I might just have to give this a go, I have a collection of pieces of paper and sketches that I have in a pile in my studio and this looks fun :) Glad you are back blogging after a refreshing rest :)
ReplyDeleteThis is SUCH fun I promise! It's also a great project if there's not much spare time to be had. Would love to see what you make if you give this a go - it's bound to be gorgeous! hugs from Shroo:)x
DeleteRight! So you've come back with a BANG! then :P
ReplyDeleteI've just scrolled through your pictures drooling. I'm off for a bath (that's bath not barf though you might be now I've planted that image in your head!) So shall be back with breakfast and a cuppa later for a proper read. Am so chuffed you have done this as I want to do book bindery type stuff but not a clue where to start. In particular I wanted to try putting a new book into an old book if that makes sense. JOY!
Be back later ;)
Honestly - this is a doddle.... you can pretty much make it up as you go along so you'll have oodles of fun if you give it a go! Interested by the 'new book into an old book' thing - I shall stalk your blog (I already do, but i mean, like, MORE) to see what you produce! Hope you had a nice relaxing bath! Hugs from Shroo :) and a casual paw wave from the Colonel, who's very much in 'Caligula' mood today. x
DeleteAm back. First things first. Some *mad waving* and swooning in super-fan stylee towards the Colonel. WE LOVE YOU COLONEL! Mwaaah, mwaaah x x x I can't help it. The more casual and stand offish he is the more I love that cat! :D
Delete*Ahem* Had a lovely bath apart from a small child standing next to it, stripping off and throwing his jammies in with me.
Loved this tutorial - going to pin it so I don't lose it. What a great idea to bind sketches. I just yesterday glued my latest one in my art journal (It was honoured, I only do that when I really, really like them!) as I never know what to do with loose sketches. And what I mean about a new book in an old one is like binding a sketchbook or like you say - a kind of memory book but inside the covers of an old books. So on the face of it, it looks like that old book till you open it... if that makes sense :)
Right - off to pin while I am thinking about it :)
The Colonel DID command that I peel you some shrooz but I wimped out! Your memory book will be EPIC! Everything you do is epic! FACT! Even the Colonel nods in mild approval...
DeleteI love your work! I used to produce a lot of fine art but Its been a long time since I have. I find your blog so inspirational, I really need to find my paints and inks again and get my mojo working. Thanks for the tutorial, it's awesome! And don't apologise for taking some time off; like you said - it's your blog so your rules! It's nice to see you back though :)
ReplyDeleteThank you so much - those are really kind words :) It would be awesome if you started your fine art up again! It's so good to know my rambly blog is useful - if I can ever help just shout ok? Hugs from Shroo:)x
DeleteSqueeling over here! OMG... such gorgeous eye candy! Thank you Shroo... now I'll be back to view through this one again for sure. I just finished one but made mine of empty cereal boxes. Love yours too as they offer so many ideas! It's super sweet! x
ReplyDeleteHee hee! Really glad you enjoyed the post - have you blogged your cereal box book? I'd so love to see it! Thank you squillions for visiting and being lovely! Hugs from Shroo:)x
DeleteVery cool... love the way you've strapped those panels onto the covers. What a great way to make a journal! Yours is fab Shroo!
ReplyDeleteThe best thing about this cover-making method is that you can add as many bits and pieces as you like - you can end up with covers that look like fish scales or mosaics! I really must get myself in gear and make a couple to blog and show what I mean. Thank you so much for your comment! hugs from Shroo:)x
DeleteGreat - really enjoyed seeing your process, and you can absolutely tell from your post that it was tremendous fun for you! Thanks for sharing and brightening up a wet day with your sunny project!
ReplyDeleteOh - it IS such fun! It's addictive too - easy to end up turning the house upside down looking for more stuff to bind into books! It does make things a heck of a lot easier to store though! Glad you enjoyed the post - hugs from Shroo:)x
DeleteOh, this is such a fabulous tutorial! You've gotten me inspired! Thank you so much, Sweets! You're one gorgeous masterpiece maker!! Lori
ReplyDeleteThank you squillions, Lori! I'm really glad you liked the tutorial - I'd love to see if you have a go :) Sending big hugs - Shroo:)x
Deletethis is just sooooo cool, I have always wanted to make a book-perhaps I will use for my natural dye samples-which I have never saved notes on before-excellent turorial thanks so much Shroo-I am bookmarking this so I can find again
ReplyDeleteKathy
Ooooo - that'll be GORGEOUS! All those colours collected together.... ooooo.... Hugely thrilled that you found this useful! Would love to see if you make one yourself! Sending hugs - Shroo:)x
DeleteHi Shroo-I found the most perfect books at a library sale yesterday-yeah-now to find some handmade papers to use in it
DeleteThat is very cool and the finished result is so stunning. I have been playing with the whole book binding ideas for ages but it seems too hard AT&T items, but this makes it look easy.... Maybe even someone like me who is terminally clumsy could do it without risking life and limb... Xx
ReplyDeleteI PROMISE You - this is soooooo easy! you can adapt it to your own skill set and I promise it'll look awesome every time - especially with some of those GORGEOUS sketches of yours (which I am totally in love with!) There's no chance at all of limb loss... although I'm not guaranteeing that you'll avoid needle-fingers or glue-face.... gets me every time! Big hugs from Shroo:)x
DeleteThis is incredible! I love altering books, I am currently working on a tutorial about how to turn a book into a secret treasure box. Your tutorial is great and so inspiring. I am going to head down to my studio right now and play! Thanks for sharing.
ReplyDeleteHugs
Caroline
Aaaaaaaaaaaaaaah - I SO Love treasure boxes! They're gorgeous and so much fun to do. This is mahoosively easy by comparison - you could make one in your sleep! And whatever you do it'll be AWESOME!!! Thank you for visiting! Big hugs from Shroo:)x
DeleteGood morning Shroo I wanted to share my link with my journal http://kathyinozarks.blogspot.com/2014/05/my-art-journal-and-sir-john-and-izzy.html thanks again for the inspiration and tutorial
ReplyDeleteI'm really glad you left this here, Kathy. I hope your gorgeous book is an inspiration to other bloggers! Love and hugs - Shroo:)xxx
DeleteThanks for inspiration! I got to fix an arty notebook for myself too! :P
ReplyDeleteAnd it...will.....be.....A*W*E*S*O*M*E!!!! Have fun with book makeyness! Sending hugs from Shroo:)xxx
Delete